As an Amazon Associate, we earn from qualifying purchases. Some links may be affiliate links at no extra cost to you. Although our opinions are based on curated research, we haven't used these products. Articles generated with AI.
How to Make a Bluetooth Speaker Step by Step
Building a DIY Bluetooth speaker requires five key steps: selecting components (drivers, amplifier board, and crossovers), gathering materials (MDF or wood for enclosure, wiring), constructing the enclosure with proper measurements and bracing, assembling a battery pack using 18650 lithium cells with protection circuits, and installing electronics with careful soldering and connection verification. After wiring speakers with attention to polarity, conduct testing to verify sound quality before final assembly. The following guide provides detailed specifications for creating your custom portable audio system.
Key Takeaways
- Select quality components including 4-ohm speakers, Bluetooth 5.4 module, amplifier board, and appropriate enclosure materials like MDF.
- Build the enclosure by precisely measuring, cutting panels with a jigsaw, adding internal braces, and securing joints with wood glue.
- Install speaker drivers (woofers, midrange, tweeters) and crossovers, ensuring proper wire connections between components.
- Assemble a power source using four 18650 batteries in series with a protection board for portable use.
- Mount the Bluetooth amplifier board, connect all electronics with correct polarity, and test the system before final assembly.
Understanding Speaker Components and Specifications
When building a Bluetooth speaker, understanding the fundamental components and their specifications serves as the essential first step toward creating a high-quality audio device. Speaker drivers are categorized by their frequency response capabilities, with woofers handling low frequencies from 60Hz to 6kHz, midrange drivers covering 200Hz to 6kHz for vocals, and tweeters managing 4kHz to 20kHz for crisp highs. Impedance ratings, typically 4 ohms for full-range models, determine compatibility with amplifiers in the Speaker Box design and greatly impact power efficiency and sound quality.
Crossovers split the audio signal into appropriate frequency bands, directing each to its designated driver. Brands like Dayton, Focal, and Fostex offer drivers with detailed specifications, including sensitivity levels and power handling capacities, allowing builders to match components that cover the human ear’s complete 20Hz-20kHz audible range. Moreover, to enhance audio performance, incorporating Bluetooth 5.4 protocols can provide stable connections for reliable wireless playback.
Selecting the Right Materials and Tools
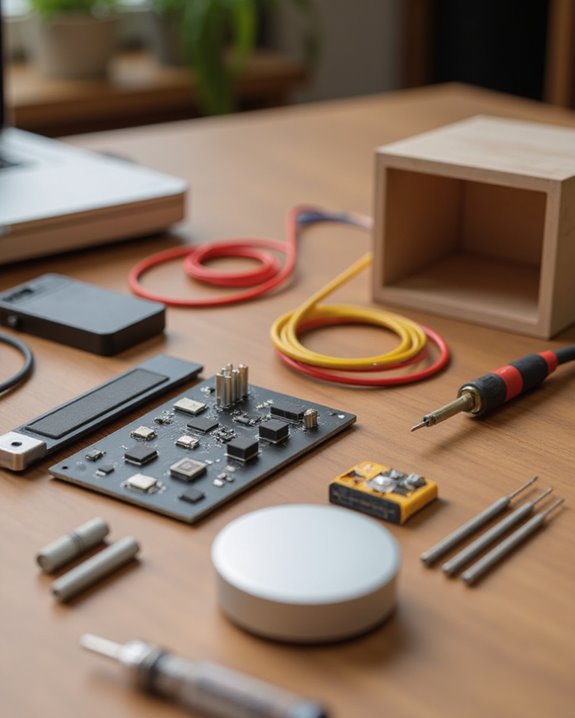
Before starting on the Bluetooth speaker building journey, careful selection of appropriate materials and tools proves essential for creating a successful audio device that delivers quality sound while remaining durable. Quality components from trusted sources like Parts Express can guarantee ideal performance without excessive cost.
For the speaker enclosure, materials such as 1/8-inch MDF provide an ideal balance of rigidity and weight, while premium woods like Walnut offer superior aesthetics. Essential tools include measuring instruments (ruler, vernier caliper), cutting implements (jigsaw, hacksaw), and a reliable soldering iron for circuit connections. Electronic components must include a compatible amplifier board that supports 4-ohm speakers and 12V power supply. When assembling the enclosure, high-quality wood glue creates secure joints that prevent sound leakage and maintain structural integrity over time.
Building Your Enclosure From MDF
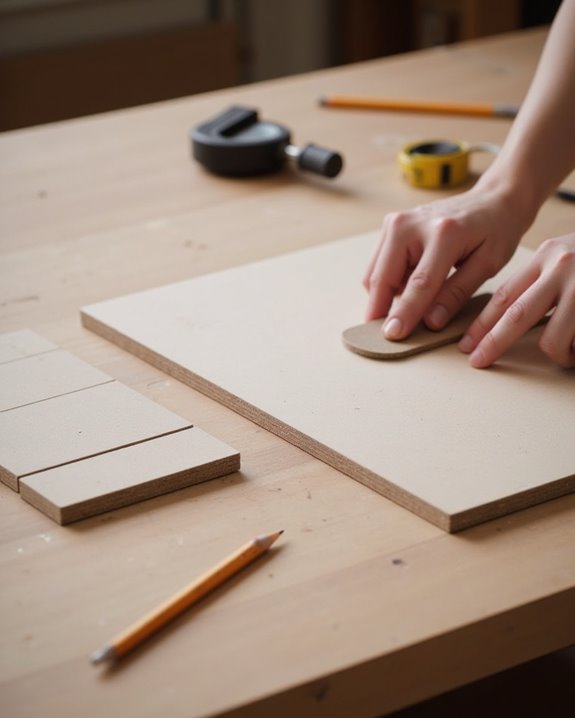
Construction of the MDF enclosure forms the critical foundation of your Bluetooth speaker project, establishing both acoustic properties and physical durability. The 1/8-inch thick MDF provides an ideal balance of rigidity and lightweight properties essential for ideal sound reproduction in both sealed and ported designs.
Begin by precisely measuring and marking the front panel, back panel, and side panels using straight rulers and compasses before cutting with a jigsaw. Pre-drill screw holes and install (1/3) x (1/3) inch wood blocks as internal braces to minimize vibration and distortion. When assembling, apply wood glue along all joining edges to create an airtight seal, which is vital for producing punchy, clean bass response. A hairdryer can expedite the drying process of the glue, allowing construction to proceed more efficiently while maintaining acoustic integrity throughout the enclosure.
Creating a Battery Pack With 18650 Cells
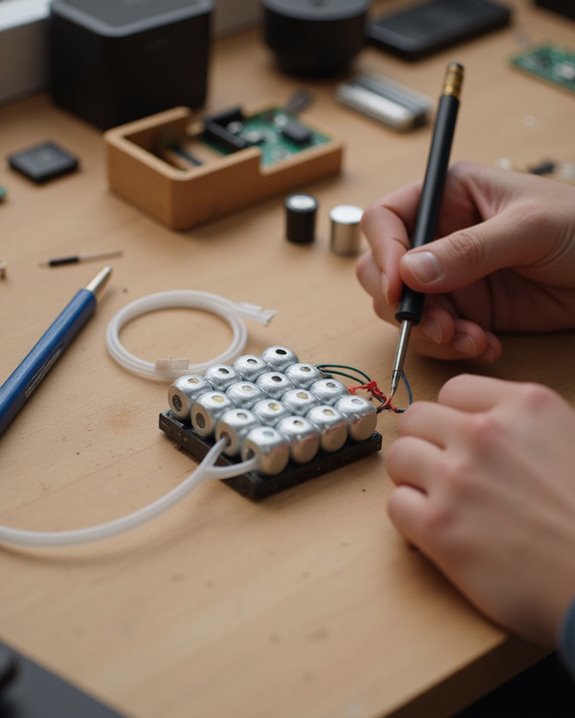
The battery pack represents the heart of any portable Bluetooth speaker system, providing the necessary electrical power through a configuration of four 18650 Lithium-Ion cells connected in series. This arrangement generates 11.1V, falling within the ideal 8V-25V range required by most amplifiers for maximum power delivery in a DIY Bluetooth speaker build. When assembling this small speaker component, builders must incorporate a Li-ion protection board to prevent uneven charging and over-discharging, which could lead to safety hazards with these high-capacity cells.
For DIY enthusiasts, 18650 cells can be sourced from local vape shops, offering excellent energy density for compact projects. Once wired together, the completed battery pack should be secured to the lower section of the enclosure with hot glue before attaching the back panels, ensuring stable integration within the finished speaker.
By using high-capacity 18650 cells, you can aim for a 20-hour battery life as seen in popular portable speakers.
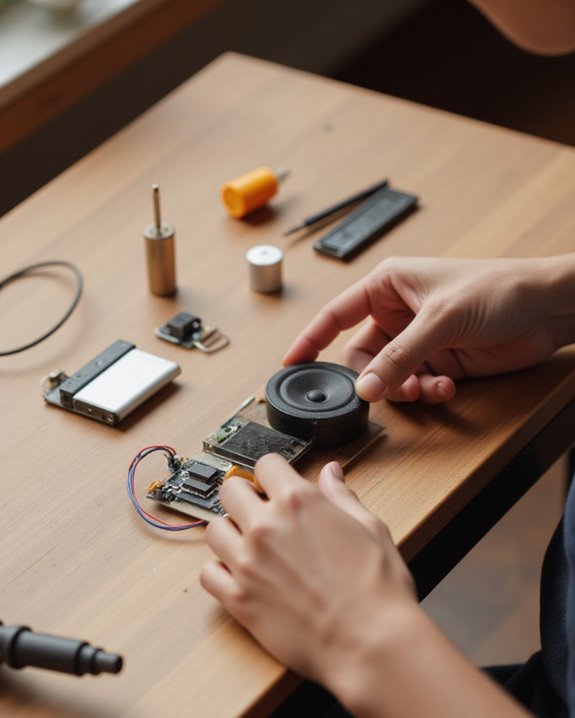
Installing the Bluetooth Amplifier Board
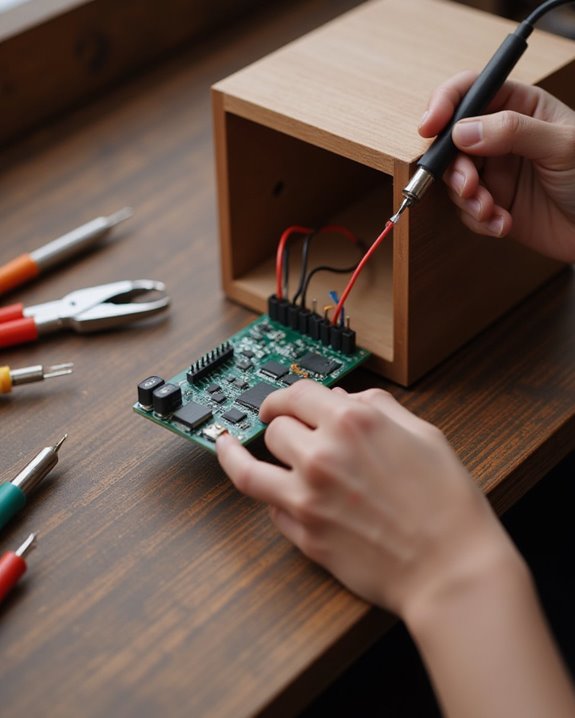
Mounting the Bluetooth amplifier board represents an essential step in the speaker assembly process, requiring careful attention to polarity and connection points for ideal performance. Technicians must connect the board to the power source by cutting the power wire near the plug end, attaching both sides to the screw-in terminals while tracking proper polarity to energize both components simultaneously. To guarantee best audio quality, one should solder speaker wires directly to the 4-ohm full-range drivers, making certain to match red-to-red and white-to-white terminals.
A ground loop isolator should be installed between the Bluetooth unit and amplifier to split the audio signal and eliminate unwanted buzzing. After securing the board inside the enclosure according to the wiring diagram, make sure to verify installation by checking for the blue indicator light upon powering up the system. For enhanced audio fidelity, consider incorporating Hi-Res Audio support into your amplifier board setup to achieve superior sound processing.
Wiring Speakers and Crossovers Properly
Proper wiring of speakers and crossovers forms the foundation of exceptional audio performance in any Bluetooth speaker assembly, requiring meticulous attention to polarity and connection integrity. When building a DIY speaker, one must solder all wires before mounting components, ensuring each connection is secure and reliable. Builders need to know that connecting the positive (red) amplifier wire to the positive speaker terminal, and the negative (white) wire to the negative terminal, maintains correct phase alignment.
When working with multiple speakers, find the correct terminals on passive crossovers such as Bessel or Linkwitz types, making sure to use proper soldering techniques for bare wires. For maximum performance, twist and solder combined ground wires together before insulating with tape. Finally, connect 4-ohm full-range speakers to the amplifier after the crossover installation is complete.
Testing and Troubleshooting Your DIY Speaker
Once the painstaking assembly of your DIY Bluetooth speaker is complete, thorough testing becomes essential to verify proper functionality before final enclosure. Begin with an initial power-up test by connecting the power supply and pairing a Bluetooth device to confirm sound output from the 4-ohm speakers, paying careful attention to audio quality and volume levels.
Install a DP-DT switch as a mute function to eliminate the amplifier’s startup pop, and incorporate an audio taper pot for precise volume control during troubleshooting. If buzzing or interference occurs, a ground loop isolator should be placed between the Bluetooth receiver and amplifier to guarantee clean signal transmission. For power delivery verification, add an LED indicator with a 470 Ohm resistor, which provides visual confirmation of proper electrical function and helps identify connection issues in the battery or charging system.
Frequently Asked Questions
How to Make a Bluetooth Speaker Homemade?
Creating homemade Bluetooth speakers requires connecting a Bluetooth module to amplifiers and speakers in an eco-friendly enclosure. Consider volume control features, music pairing capabilities, and weather resistance for outdoor use. Customize with decorative elements.
What Parts Do I Need to Make a Bluetooth Speaker?
Take the plunge into DIY audio with essential Bluetooth speaker components: Bluetooth modules (like KAB boards), speaker components (4-ohm full-range drivers), amplifier types (8-25V input), battery choices (18650 Li-Ion), and part alternatives like ground loop isolators.
How to Convert a Normal Speaker to a Bluetooth Speaker?
Speaker upgrade requires installing a Bluetooth module, amplifier, and isolator. The conversion techniques involve connecting these to the existing speaker with proper wiring. This wireless modification enables audio adaptation through Bluetooth retrofit functionality.
How to Make a Speaker Step by Step?
Building speakers requires MONUMENTAL attention to detail. Speaker design begins with selecting drivers, followed by cabinet assembly using acoustic materials. Complete internal wiring basics carefully before conducting thorough frequency testing to evaluate performance.